How to prevent CUPS omitting the bottom of the CUPS Printer test page

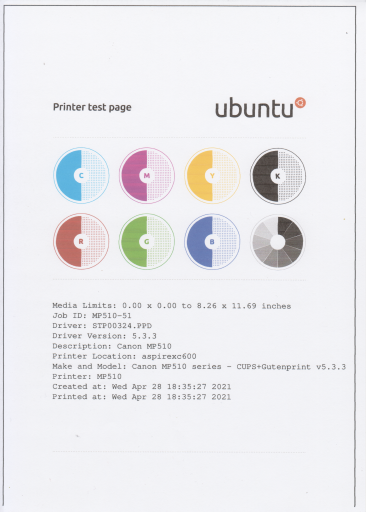
This is something that has been bugging me for years but I never bothered to look into it until now. When I set up a printer using CUPS Administration and then print a test page, for some printers the bottom of the test page image is cut off, as shown in the scanned image below. Also, the left side of the test page image is too close to the left side of the sheet of paper. This happens when I use the Gutenprint printer drivers, although I do not know if that is a coincidence. The CUPS printer test page (A4 paper) shown below is from a Canon PIXMA MP510 printer using the Gutenprint v5.3.3 driver for that model.

Printer test page printed by CUPS before modifying the Canon PIXMA MP510 PPD file

I had a look at the values of the ImageableArea for A4 paper in the printer’s PPD file, and the as-installed values were as follows:

user $ sudo grep "ImageableArea A4" /etc/cups/ppd/MP510.ppd
*ImageableArea A4/A4:   "0.000 0.000 595.000 842.000"

I then edited the PPD file and changed the x,y coordinates of the bottom left of the imageable area from 0,0 to 10,3 for A4 paper so the file now contains the following:

user $ sudo grep "ImageableArea A4" /etc/cups/ppd/MP510.ppd
*ImageableArea A4/A4:   "10.000 3.000 595.000 842.000"

It is necessary to restart CUPS when a change is made to the PPD file:

Gentoo Linux installation using OpenRC

user $ sudo rc-service cupsd restart

Lubuntu 20.10 installation using systemd

user $ sudo systemctl restart cups

Now the ‘Printer test page’ printed by CUPS looks like this:

Printer test page printed by CUPS after modifying the Canon PIXMA MP510 PPD file

Much better.
 
 
ADDENDUM (2 May 2021): I have discovered that the ImageableArea is not the only factor…

I also have a Canon PIXMA MP560 printer, and I printed a CUPS ‘Printer test page’ on that using the Gutenprint v5.3.3 driver for the Canon PIXMA MP560. A scan of the printed test page is shown below:

Printer test page printed by CUPS before modifying the Canon PIXMA MP560 PPD file

The as-installed values of the ImageableArea for A4 paper in the printer’s PPD file were as follows:

user $ sudo grep "ImageableArea A4" /etc/cups/ppd/Canon_MP560_Wi-Fi.ppd
*ImageableArea A4/A4:   "0.000 0.000 595.000 842.000"

Unlike the original test page for the Canon PIXMA MP510, the vertical lines on the left and right sides of the test image are more or less equidistant from the edges of the paper. However, as with the original test page for the Canon PIXMA MP510, the bottom line of the test page was missing. So I tried editing the y coordinate of the bottom left of the ImageableArea in the PPD file for the Canon PIXMA MP560. However, whatever value I used for the y coordinate of the bottom left of the test image, the bottom line was never printed.

I then looked at the contents of the file /etc/cups/printers.conf and found that the configuration for the Canon PIXMA MP510 included a line ‘Option fitplot True‘ whereas the configuration for the Canon PIXMA MP560 did not:

# Printer configuration file for CUPS v2.3.3
# Written by cupsd
# DO NOT EDIT THIS FILE WHEN CUPSD IS RUNNING
NextPrinterId 3
<Printer Canon_MP560_Wi-Fi>
PrinterId 2
UUID urn:uuid:428a074e-0e81-3ba3-7789-f8050da82c5a
Info Canon MP560 Wi-Fi
Location My office upstairs
MakeModel Canon PIXMA MP560 - CUPS+Gutenprint v5.3.3
DeviceURI lpd://192.168.1.78/lpt1
State Idle
StateTime 1619978009
ConfigTime 1619880075
Type 36892
Accepting Yes
Shared No
JobSheets none none
QuotaPeriod 0
PageLimit 0
KLimit 0
OpPolicy default
ErrorPolicy retry-job
</Printer>
<DefaultPrinter MP510>
PrinterId 1
UUID urn:uuid:0a2a12b5-ea49-33eb-572a-341c1af02f7e
Info Canon MP510
Location aspirexc600
MakeModel Canon MP510 series - CUPS+Gutenprint v5.3.3
DeviceURI usb://Canon/MP510?serial=934631&interface=1
State Idle
StateTime 1619662185
ConfigTime 1619628669
Type 36876
Accepting Yes
Shared Yes
JobSheets none none
QuotaPeriod 0
PageLimit 0
KLimit 0
OpPolicy default
ErrorPolicy retry-job
Option fitplot True
</DefaultPrinter>

 
So I stopped the CUPS service, edited the file to add the line ‘Option fitplot True‘ for the Canon PIXMA MP560, and restarted the CUPS service:

user $ sudo systemctl stop cups
user $ sudo nano /etc/cups/printers.conf
user $ sudo systemctl start cups

The file now looks like this:

# Printer configuration file for CUPS v2.3.3
# Written by cupsd
# DO NOT EDIT THIS FILE WHEN CUPSD IS RUNNING
NextPrinterId 3
<Printer Canon_MP560_Wi-Fi>
PrinterId 2
UUID urn:uuid:428a074e-0e81-3ba3-7789-f8050da82c5a
Info Canon MP560 Wi-Fi
Location My office upstairs
MakeModel Canon PIXMA MP560 - CUPS+Gutenprint v5.3.3
DeviceURI lpd://192.168.1.78/lpt1
State Idle
StateTime 1619978009
ConfigTime 1619880075
Type 36892
Accepting Yes
Shared No
JobSheets none none
QuotaPeriod 0
PageLimit 0
KLimit 0
OpPolicy default
ErrorPolicy retry-job
Option fitplot True
</Printer>
<DefaultPrinter MP510>
PrinterId 1
UUID urn:uuid:0a2a12b5-ea49-33eb-572a-341c1af02f7e
Info Canon MP510
Location aspirexc600
MakeModel Canon MP510 series - CUPS+Gutenprint v5.3.3
DeviceURI usb://Canon/MP510?serial=934631&interface=1
State Idle
StateTime 1619662185
ConfigTime 1619628669
Type 36876
Accepting Yes
Shared Yes
JobSheets none none
QuotaPeriod 0
PageLimit 0
KLimit 0
OpPolicy default
ErrorPolicy retry-job
Option fitplot True
</DefaultPrinter>


I have the ImageableArea for A4 paper configured as follows in the Canon PIXMA MP560 PPD file for the Gutenprint v5.3.3 driver (I had to increase the y coordinate of the bottom left of the area to 2.000 in order for the bottom line to be printed):

user $ sudo grep "ImageableArea A4" /etc/cups/ppd/Canon_MP560_Wi-Fi.ppd
*ImageableArea A4/A4:   "0.000 2.000 595.000 842.000"

After restarting the CUPS service I printed another CUPS Printer test page and the result is shown below. As you can see, the bottom line is now printed.

Printer test page printed by CUPS after modifying the Canon PIXMA MP560 PPD file

So, if the outline of the CUPS Printer test page is not centred or is missing one or more of the lines, first adjust the ImageableArea for the paper size on which the test page is being printed, and, if that does not result in success, check if ‘Option fitplot‘ exists for the printer in the file /etc/cups/printers.conf and that it is set to ‘True‘.
Work-around in Linux to switch between single-sided and double-sided printing

I use Gentoo Linux on my laptop, and have drivers installed for quite a few printer manufacturers and models, as I work in multiple offices and they have a wide range of printers and MFPs. To date I have had no trouble printing single-sided (‘simplex’) and double-sided (‘duplex’) documents on the printers that support duplex printing. However, one of the offices I have been working in recently has a Konica Minolta bizhub C368, a floor-standing MFP, and the printer in this MFP did not enable me to switch between single-sided and double-sided printing even though Windows users in the same office could. This article explains how I managed to switch between the two printing modes.

A Linux driver for the bizhub C368 can be downloaded from the Konica Minolta Download Centre. I downloaded the tarball KMbeuUXv1_22_multi_language.tar.gz, extracted the contents to the directory ~/KMbeuUXv1_22_multi_language/ and followed the instructions in ‘BEU Linux CUPS Driver Guide.pdf‘:

user $ cd ~/KMbeuUXv1_22_multi_language
user $ su
root # ./install.pl
root # rc-service cupsd restart

I then used the CUPS Administration page in a browser window to set up the printer.

As I wanted the printer to be the default printer while I was working in that office, I edited the system-wide and user-specific lpoptions files to contain the printer name I had specified to CUPS when setting up the printer:

user $ cat ~/.cups/lpoptions
Default Konica_Minolta_bizhub_C368
root # cat /etc/cups/lpoptions
Default Konica_Minolta_bizhub_C368

I was then able to print from all the usual applications, except that the applications could only select single-sided printing, even though the printer supports double-sided printing and Windows users in the office could print double-sided. I could not find a setting for this in the CUPS Manager’s ‘Set Default Options’ page for the printer, so I edited the PPD file to change the relevant default option:

root # nano /etc/cups/ppd/Konica_Minolta_bizhub_C368.ppd

I changed the default printing option from:

*DefaultKMDuplex: 1Sided

to:

*DefaultKMDuplex: 2Sided

Then I could print double-sided pages, but selecting ‘single-sided’ in applications would still print double-sided. Now, I don’t know if there is a proper fix for this, but I could not find out how to do it. Therefore I opted for a work-around which is fine for my purposes. Here is what I did…

I created the shell script ~/Konica_Minolta_bizhub_C368.sh containing the following:

#!/bin/bash
echo
echo "Konica Minolta bizhub C368 printer"
echo
echo "Select single-sided or double-sided printing as the default"
echo
# Get the password entry over and done with now
echo "Enter your user account password."
sudo ls > /dev/null
echo
CHOICE=""
while [[ $CHOICE != "X" && $CHOICE != "x" ]]; do
    if [[ $CHOICE != "X" && $CHOICE != "x" ]]; then
        echo
        echo -n "[1]-sided, [2]-sided or e[X]it : "
        read -n1 CHOICE
        echo
    else
        break
    fi
    case $CHOICE in
        [1] ) sudo cp /home/fitzcarraldo/Konica_Minolta_bizhub_C368/Konica_Minolta_bizhub_C368.ppd.single-sided /etc/cups/ppd/Konica_Minolta_bizhub_C368.ppd
              echo "Single-sided printing has been selected"
        ;;
        [2] ) sudo cp /home/fitzcarraldo/Konica_Minolta_bizhub_C368/Konica_Minolta_bizhub_C368.ppd.double-sided /etc/cups/ppd/Konica_Minolta_bizhub_C368.ppd
              echo "Double-sided printing has been selected"
        ;;
        [Xx] ) echo; exit;;
        * ) echo; echo " Enter '1', '2' or 'X/x'"
    esac
done

I created the Desktop Configuration File ~/Desktop/Konica_Minolta_bizhub_C368.desktop containing the following:

[Desktop Entry]
Comment[en_GB]=Select single-sided or double-sided printing for Konica Minolta bizhub C368
Comment=Select single-sided or double-sided printing for Konica Minolta bizhub C368
Encoding=UTF-8
Exec=konsole -e sh /home/fitzcarraldo/Konica_Minolta_bizhub_C368.sh
GenericName[en_GB]=Select printing sides for KM bizhub C368
GenericName=Select printing sides for KM bizhub C368
Icon=/home/fitzcarraldo/Pictures/Icons/konica-minolta.png
MimeType=
Name[en_GB]=Konica_Minolta_bizhub_C368
Name=Konica_Minolta_bizhub_C368
Path=
StartupNotify=true
Terminal=true
TerminalOptions=
Type=Application
X-DBUS-ServiceName=
X-DBUS-StartupType=none
X-DCOP-ServiceType=
X-KDE-SubstituteUID=false
X-KDE-Username=

I downloaded a Konica Minolta logo from the Web and used it for the icon for the Desktop Configuration File.

And finally I copied the PPD file to two files and edited them:

~/Konica_Minolta_bizhub_C368/Konica_Minolta_bizhub_C368.ppd.single-sided

which includes *DefaultKMDuplex: 1Sided

~/Konica_Minolta_bizhub_C368/Konica_Minolta_bizhub_C368.ppd.double-sided

which includes *DefaultKMDuplex: 2Sided

Now, if I want to switch between single-sided and double-sided printing I just double-click on the icon on my Desktop and a terminal window pops-up allowing me to select the new default:

Konica Minolta bizhub C368 printer

Select single-sided or double-sided printing as the default

Enter your user account password.
Password:

[1]-sided, [2]-sided or e[X]it :

Not able to access the CUPS Printer Manager in Firefox when, or after, using a proxy server

Just a quick tip if you are trying to use the CUPS Printer Manager in a Firefox browser window (http://localhost:631/) to add a printer, manage a printer or view print jobs but the brower displays a message such as ‘Connecting to 10.48.80.49…’ and eventually times out and displays the following message:

 Network Error (tcp_error)

A communication error occurred: “Operation timed out”
The Web Server may be down, too busy, or experiencing other problems preventing it from responding to requests. You may wish to try again at a later time.

For assistance, contact your network support team.

or the following message:

Unable to connect

Firefox can’t establish a connection to the server at 10.48.80.49.

    The site could be temporarily unavailable or too busy. Try again in a few moments.
    If you are unable to load any pages, check your computer’s network connection.
    If your computer or network is protected by a firewall or proxy, make sure that Firefox is permitted to access the Web.

    Try Again

This sometimes happens to me when my laptop is connected to a corporate network and the browser is, or recently was, configured to use a proxy server. Anyway, in Firefox I select ‘Open menu’ > ‘Preferences’ > ‘Network’ > ‘Settings…’ and make sure ‘No proxy’ is selected, then I select ‘Open menu’ > ‘Preferences’ and click on the ‘Clear Now’ button for ‘Cached Web Content’ (I have to click twice to clear the cache, for some reason) and the ‘Clear Now’ button for ‘Offline Web Content and User Data’. After doing this, I can access all the CUPS Printer Manager pages in the browser again.

Installing and configuring the CUPS-PDF virtual printer driver

Some applications, such as LibreOffice, have built-in support for exporting their output to PDF files. For applications without built-in support for creating PDF files there may already be an installed ‘Print to File (PDF)’ driver in your installation that you can use. However, the Print to File (PDF) option does not appear in the list of available printers in all applications. Fortunately, CUPS has a driver named CUPS-PDF which you can install to create a virtual printer that will produce PDF files.

I install the package net-print/cups-pdf and use the CUPS Printer Manager in a browser to set up a virtual printer to ‘print’ PDF files. I use the driver in conjunction with a shell script that calls a utility to display a ‘Save As’ dialogue box so the user can specify the directory and name of the PDF file.

KDialog (KDE/Qt) and Zenity (GTK+) are two well-known dialogue box tools for use in shell scripts (see, for example, the Linux Magazine article Adding graphic elements to your scripts with Zenity and KDialog). However, although I use KDE on my main laptop, I was unable to get KDialog working properly in a shell script launched by the CUPS PDF driver, so I resorted to using Zenity, which I found simple to use and reliable. My shell script using Zenity is listed further down.

Although Zenity has performed this job perfectly for me in all releases of KDE since 2007, it rankled that I could not get KDialog to do the job. However, a couple of Gentoo users were able to use KDialog successfully with the CUPS PDF driver, each with a different approach to the other, but their approaches both consisted of two shell scripts. In contrast, a solution using Zenity uses only one shell script. You can see the KDialog solutions by the two users (Havin_it and sicvolo) in Gentoo Forums thread [TIP] CUPS-PDF “Save As” with kdialog. I was determined to have a single shell script using KDialog, and was able to conflate sicvolo‘s two-script solution. My thanks go to him for his clever code in his two shell scripts, as I would never have worked it out myself. My single shell script using KDialog is listed further down.

First I will explain how to install the CUPS PDF driver package, then how to use the CUPS Printer Manager to install the virtual printer, and finally how to use a shell script with either Zenity or KDialog in order to display a graphical dialogue box prompting you to specify the directory and file name for the PDF file to be created. I use Gentoo Linux, but the procedure will be similar in other distributions (package manager commands excepted).

1.0  Installation of the cups-pdf driver and virtual printer

1.1  Install the cups-pdf package:

# emerge cups-pdf

1.2  Launch a Web browser and enter http://localhost:631/ in the Address bar to display the CUPS Printer Manager.

1.3  Click on ‘Administration’ to call up the Administration page, then click ‘Add Printer’. If prompted, enter the username ‘root’ (without the quotes) and the root user’s password.

1.4  Select ‘CUPS-PDF (Virtual PDF Printer)’ in the list of local printers, and click ‘Continue’.

1.5  Enter a name, decription and location for the virtual printer. For example, I entered ‘Virtual_PDF_Printer’, ‘Virtual PDF Printer’ and ‘Mesh Edge DX’ (without the quotes), respectively. Then click ‘Continue’.

1.6  Select ‘Generic’ in the ‘Make:’ box, and click ‘Continue’.

1.7  Select ‘Generic CUPS-PDF Printer (w/ options) (en)’ in the ‘Model:’ box, and click ‘Add Printer’. The virtual printer should now be available for you to use.

1.8  When you come to print from an application, if you select Virtual_PDF_Printer from the list of available printers the PDF file will be saved in the directory /var/spool/cups-pdf/<your username>/. Note that the directory will be created automatically the first time you ‘print’ to PDF.

1.9  Optionally, you could create a shortcut (Desktop Config File) on your Desktop to open the directory mentioned in Step 1.8 above.

1.10 Optionally, instead of Step 1.9 you could edit the file /etc/cups/cups-pdf.conf as root user to get cups-pdf to ‘print’ PDF documents to your Desktop instead of in /var/spool/cups-pdf/<your username>/, by changing the line:

#Out /var/spool/cups-pdf/${USER}

to:

Out ${HOME}/Desktop


2.0  How to display a dialog box prompting for the directory and file name of the PDF file

If you prefer to be prompted for a file name so that you can save the PDF file wherever you want and give it any name you want, perform the steps below instead of Steps 1.9 or 1.10 above. Either perform the steps in 2.1 (Zenity) or the steps in 2.2 (KDialog). Then perform the steps in 2.3, which apply in both cases.

2.1   Zenity (GTK+)

2.1.1   Install Zenity:

# emerge zenity

2.1.2   Check it is installed:

# eix -I zenity
[I] gnome-extra/zenity
Available versions: 3.12.1 {debug libnotify test +webkit}
Installed versions: 3.12.1(13:49:47 04/12/14)(libnotify webkit -debug -test)
Homepage: https://wiki.gnome.org/Projects/Zenity
Description: Tool to display dialogs from the commandline and shell scripts

2.1.3   Using a text editor, create the following shell script in your home directory and give it a meaningful name, such as cups-pdf_script.sh:

#!/bin/bash
CURRENT_PDF="${1}"
CURRENT_USER="${2}"
DISPLAY=:0.0
export DISPLAY
XAUTHORITY=/home/${CURRENT_USER}/.Xauthority
export XAUTHORITY
PDFNAME=$(zenity --file-selection --save --confirm-overwrite)
mv "$CURRENT_PDF" "$PDFNAME"

2.2   KDialog (KDE/Qt)

2.2.1   Install KDialog:

# emerge kde-base/kdialog

2.2.2   Check it is installed:

# eix -I kde-base/kdialog
[I] kde-base/kdialog
Available versions: (4) 4.12.5(4/4.12) (~)4.14.2(4/4.14) (~)4.14.3(4/4.14)
{aqua debug}
Installed versions: 4.14.3(4)(00:56:36 04/12/14)(-aqua -debug)
Homepage: http://www.kde.org/
Description: KDialog can be used to show nice dialog boxes from shell scripts

2.2.3   Using a text editor, create the following shell script in your home directory and give it a meaningful name such as cups-pdf_script.sh:

#!/bin/bash

get_dbus()
{
if [ -z $1 ]; then
    echo "specify user" >> $HOME/cups-pdf_script.log
    return 1
fi
# Search these processes for the session variable (they are run as the current user and have the DBUS session variable set)
compatiblePrograms=( kdeinit kded4 pulseaudio trackerd )

# Attempt to get a program pid
for index in ${compatiblePrograms[@]}; do
   PID=$(ps -ef | grep $1 | grep ${index} | head -1 | awk '{print $2}')
   if [[ "${PID}" != "" ]]; then
      break
   fi
done
if [[ "${PID}" == "" ]]; then
   echo "Could not detect active login session" >> $HOME/cups-pdf_script.log
   return 1
fi
QUERY_ENVIRON="$(tr '\0' '\n' < /proc/${PID}/environ | grep "DBUS_SESSION_BUS_ADDRESS" | cut -d "=" -f 2-)"
if [[ "${QUERY_ENVIRON}" != "" ]]; then
#   echo ${QUERY_ENVIRON} >> $HOME/cups-pdf_script.log
   return 0
else
   echo "Could not find dbus session ID in user environment." >> $HOME/cups-pdf_script.log
   return 1
fi
}

CURRENT_PDF="$1"
CURRENT_USER="$2"

export DISPLAY=:0
export XAUTHORITY=/home/${CURRENT_USER}/.Xauthority
export HOME=/home/${CURRENT_USER}/
CONFIG_FILE="/home/${CURRENT_USER}/.pdf-writer.conf"
CANCELLED="No"

date > $HOME/cups-pdf_script.log

get_dbus ${CURRENT_USER}
if [ $? -eq 0 ]; then
   export DBUS_SESSION_BUS_ADDRESS=${QUERY_ENVIRON}
   while [ True ]; do
      CURDATE=$(/bin/date +%Y%m%d)
      CURNAME=$(/bin/cat "$CONFIG_FILE")
      BASENAME=$(basename $CURRENT_PDF)
      FILENAME=$(/usr/bin/kdialog --getsavefilename "$CURNAME$CURDATE-" "*.pdf" --title="Save PDF")
      if [ $? -eq 1 ]; then
         CANCELLED="Yes"
         break
      fi
      echo $FILENAME
      if [ ! "$FILENAME" = "" ]; then
         if [ -e "$FILENAME" ]; then
            /usr/bin/kdialog --warningcontinuecancel "File already exists"
            if [ $? -eq 1 ]; then
               continue;
            fi
         fi
         FILENAME=$(echo $FILENAME.pdf | sed -re "s/(\.pdf)+$/.pdf/g")
         break;
      else
         /usr/bin/kdialog --error "You must select a file or hit Cancel."
      fi
      break
   done
   if [ "${CANCELLED}" == "No" ]; then
      /bin/cp "${CURRENT_PDF}" "${FILENAME}"
      okular "${FILENAME}" &
   fi
   /bin/rm "${CURRENT_PDF}"
   echo "No errors encountered." >> $HOME/cups-pdf_script.log
   exit 0
else
   /bin/rm "${CURRENT_PDF}"
   echo "Errors encountered." >> $HOME/cups-pdf_script.log
   exit 1
fi

2.3   Whichever of the above two options (Zenity or KDialog) you chose, do the following:

2.3.1   Make the shell script file executable:

# chmod +x /home/<your username>/cups-pdf_script.sh

2.3.2   Edit the file /etc/cups/cups-pdf.conf, find the line starting with ‘#PostProcessing‘, and change it to:

PostProcessing /home/<your username>/cups-pdf_script.sh

2.3.3   Restart CUPS:

# /etc/init.d/cupsd restart # If your installation uses OpenRC.

# systemctl restart cups.service # If your installation uses systemd.

Now, when you select Virtual_PDF_Printer from your applications’ list of available printers and click ‘Print’, a pop-up window should appear, allowing you to select the target directory for the PDF file and enter a file name of your choice.